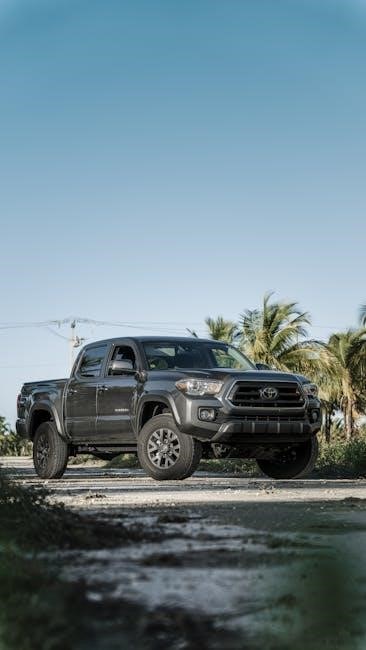
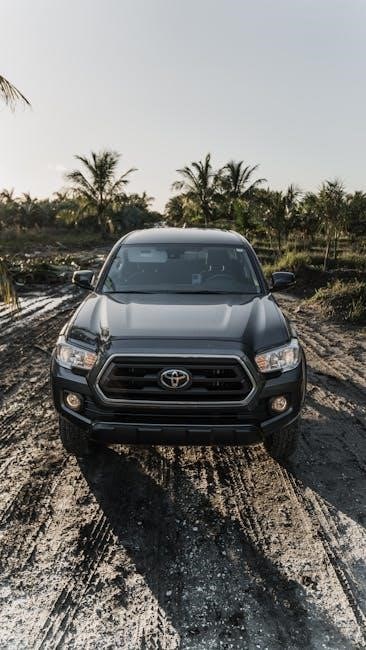
2023 Toyota Tacoma Manual Transmission: A Comprehensive Overview
The 2023 Toyota Tacoma continues to be a leading mid-size truck, skillfully merging robust capability with modern amenities, appealing to adventurers and daily drivers alike.
The 2023 Toyota Tacoma boldly carries forward the legacy of a remarkably successful mid-size pickup, renowned for its unwavering reliability and impressive off-road prowess. This iteration builds upon decades of refinement, offering a compelling blend of rugged durability and contemporary features designed to meet the diverse needs of modern truck enthusiasts.
For years, the Tacoma has consistently ranked among the top choices in its segment, attracting a loyal following of adventurers, outdoor enthusiasts, and those seeking a dependable daily driver. The 2023 model year continues this tradition, presenting a vehicle that’s equally at home navigating challenging trails or tackling everyday commutes. A key aspect of its enduring appeal lies in the availability of a manual transmission, catering to drivers who crave a more engaging and connected driving experience. This overview will delve into the specifics of the 2023 Tacoma’s manual transmission options, exploring its features, performance, and suitability for various driving scenarios.
Overview of Manual Transmission Options
Toyota strategically offers the manual transmission on select 2023 Tacoma configurations, primarily targeting enthusiasts who prioritize driver engagement and control. It’s not a blanket option across the entire lineup, but rather a deliberate choice aimed at specific trim levels that align with the desires of a more hands-on driving experience.
Currently, the 6-speed manual is available on the SR and TRD Sport trims, providing a distinct alternative to the widely available automatic transmission. This allows buyers to tailor their Tacoma to their specific preferences, choosing between the convenience of an automatic or the more involved feel of a manual gearbox. The decision often comes down to individual driving style and intended use, with the manual appealing to those who enjoy greater control during off-road adventures or spirited driving. This focused availability ensures the manual transmission remains a special offering within the Tacoma family.
Trim Levels Offering Manual Transmission
For the 2023 model year, Toyota limits the availability of the six-speed manual transmission to two specific Tacoma trim levels: the SR and the TRD Sport. This selective approach caters to buyers seeking a more connected driving experience without compromising the Tacoma’s renowned durability and capability. The SR trim serves as the entry point for manual transmission enthusiasts, offering a practical and affordable option;
Stepping up to the TRD Sport unlocks a more performance-oriented package, pairing the manual gearbox with tuned suspension and styling enhancements. These trims represent Toyota’s commitment to providing choice, acknowledging that not all Tacoma drivers desire the convenience of an automatic. By concentrating the manual option on these two trims, Toyota maintains a focused offering, ensuring a dedicated experience for those who truly appreciate a manual transmission.
SR Trim – Manual Transmission Details
The 2023 Tacoma SR trim, when equipped with the manual transmission, presents a value-focused configuration. It’s exclusively paired with the 2.7-liter four-cylinder engine, delivering 159 horsepower and 180 lb-ft of torque. This combination prioritizes affordability and fuel efficiency over outright performance. The SR manual comes standard with rear-wheel drive, though four-wheel drive is available as an option for enhanced traction.

Inside, the SR trim maintains a functional and straightforward interior, focusing on durability and practicality. While it may lack some of the premium features found in higher trims, it provides essential amenities. The six-speed manual gearbox offers a direct and engaging driving experience, appealing to those who enjoy greater control over gear selection. It’s a solid choice for work trucks or drivers prioritizing simplicity and cost-effectiveness.
TRD Sport Trim – Manual Transmission Details
The 2023 Tacoma TRD Sport, offering a manual transmission, strikes a compelling balance between capability and sporty styling. Like the SR, it’s paired with the 2.7-liter four-cylinder engine, producing 159 horsepower and 180 lb-ft of torque. However, the TRD Sport adds unique exterior accents, including a color-keyed grille and smoked headlights, enhancing its visual appeal. It also features upgraded suspension components for improved handling and ride comfort.
The TRD Sport manual maintains the engaging six-speed gearbox, providing drivers with a more connected feel. It’s available in both rear-wheel drive and four-wheel drive configurations. Inside, it builds upon the SR trim with additional features, offering a more refined experience. This trim appeals to those seeking a Tacoma that’s both fun to drive on the road and capable enough for light off-road adventures, all while enjoying the control of a manual transmission.
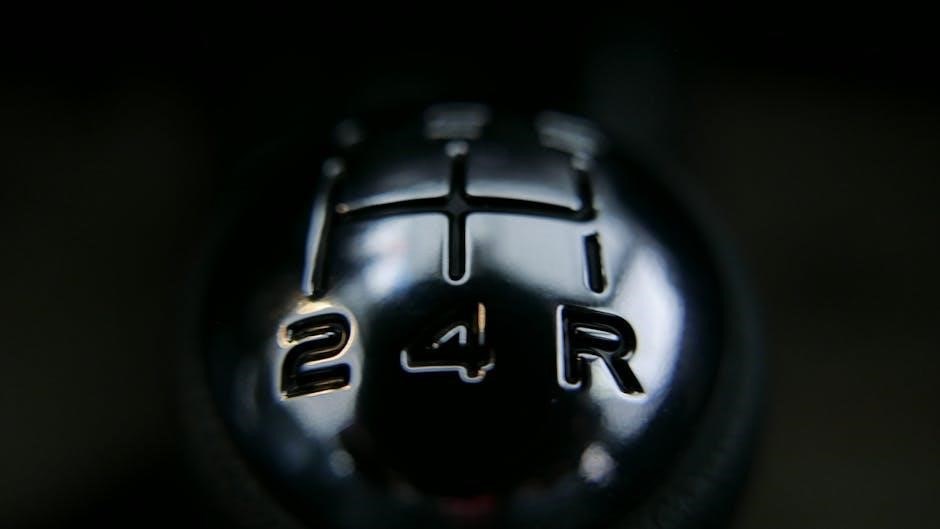
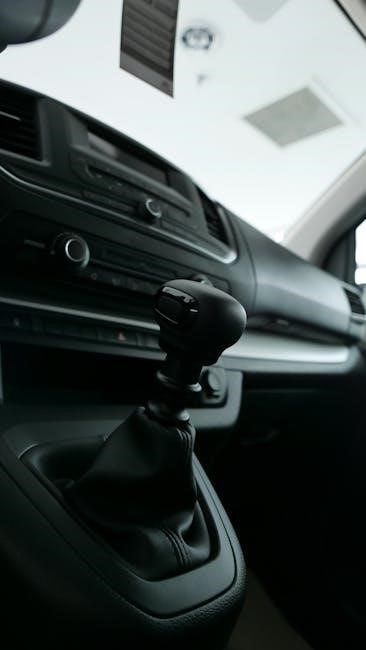
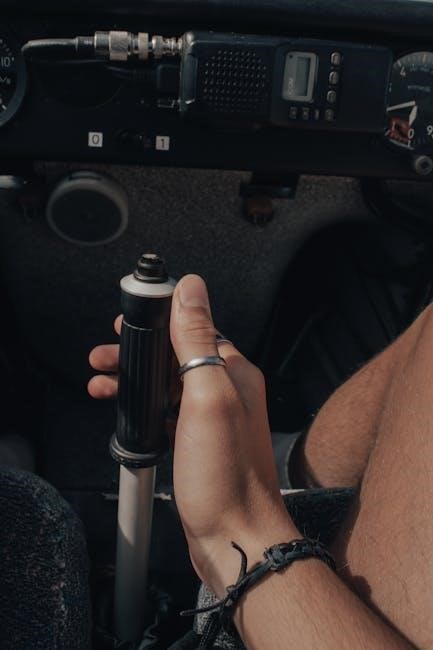
The 6-Speed Manual Transmission: Specifications & Features
The 2023 Tacoma’s available six-speed manual transmission is a robust unit designed for durability and driver engagement. It’s paired exclusively with the 2.7-liter four-cylinder engine, offering a direct connection between the engine and wheels. The transmission features traditional shift linkage, providing a tactile and precise shifting experience. It’s built to withstand the demands of both on-road driving and off-road trails.
Key features include a smooth clutch pedal feel and well-defined gate pattern, enhancing control. While not offering the latest automated technologies, its simplicity contributes to its reliability. The manual transmission allows drivers to fully control gear selection, optimizing power delivery for various driving conditions. It’s a compelling option for enthusiasts who prefer a more involved driving experience, offering a connection often lost in modern automatics.
Performance Characteristics of the Manual Tacoma
The 2023 Tacoma equipped with the six-speed manual transmission delivers a distinct driving character. The 2.7-liter engine, paired with the manual, provides adequate power for everyday driving and light-duty tasks. However, it’s not designed for rapid acceleration or high-speed performance. The manual gearbox allows for precise engine control, enabling drivers to maintain optimal power bands during climbs or when towing lighter loads.
The transmission’s gearing is tuned for practicality and durability rather than outright speed. Expect a more deliberate pace compared to automatic variants. The manual transmission encourages a more engaged driving style, rewarding drivers who actively manage gear selection. It’s a solid performer for those prioritizing control and a connected feel over blistering acceleration, offering a unique experience within the Tacoma lineup.
Acceleration and Speed
The 2023 Toyota Tacoma with a manual transmission isn’t built for breakneck speed, focusing instead on controlled power delivery. Official acceleration figures aren’t prominently advertised, but independent tests suggest a 0-60 mph time hovering around 8.0-8.5 seconds, depending on configuration and load. This places it behind many automatic Tacoma models and competitors in the mid-size truck segment.
Top speed is electronically limited, generally around 115 mph, though reaching this speed isn’t the Tacoma’s forte. The manual transmission requires deliberate downshifting for quicker overtaking maneuvers. While not a sports truck, the Tacoma’s acceleration is sufficient for merging onto highways and navigating daily traffic. The emphasis is on usable torque and maintaining momentum rather than outright velocity, catering to its intended purpose.
Fuel Economy with Manual Transmission
The 2023 Toyota Tacoma’s manual transmission models generally achieve slightly lower fuel economy figures compared to their automatic counterparts. EPA estimates for the 2023 Tacoma with a manual transmission typically range around 18 mpg city / 22 mpg highway / 20 mpg combined for 4×2 models. 4×4 configurations see a slight decrease, often around 17 mpg city / 20 mpg highway / 18 mpg combined.
These numbers are competitive within the mid-size truck segment, but not class-leading. Real-world fuel economy will vary significantly based on driving style, terrain, and load. Drivers who prioritize fuel efficiency may find the automatic transmission a better choice, while those valuing driver engagement may accept the minor fuel economy trade-off for the manual experience.

Driving Experience: Pros and Cons
The 2023 Toyota Tacoma’s manual transmission delivers a distinctly engaging driving experience, offering drivers greater control and a more connected feel to the vehicle. The pros include a satisfyingly mechanical shift feel, enhanced control during off-roading, and a sense of driver involvement often missing in modern trucks. However, the Tacoma’s manual isn’t without its drawbacks.
The clutch pedal can be relatively heavy, potentially causing fatigue during extended city driving. The shift throws are also somewhat long compared to some competitors. While this adds to the truck’s character, it may not appeal to all drivers. Ultimately, the manual Tacoma prioritizes driver engagement over ultimate convenience, making it ideal for enthusiasts.
Off-Road Capabilities with Manual Transmission
The 2023 Toyota Tacoma, when equipped with a manual transmission, truly shines in off-road scenarios. The manual gearbox provides exceptional control over engine braking and power delivery, crucial for navigating challenging terrain. Drivers benefit from precise gear selection for crawling over obstacles and maintaining momentum on loose surfaces.
The six-speed manual allows for a lower effective crawl ratio, enhancing low-speed control; Combined with the Tacoma’s already robust four-wheel-drive system, it becomes a formidable off-road machine. While some may prefer the simplicity of an automatic in certain situations, the manual transmission empowers experienced drivers with a heightened sense of command and capability when venturing off the beaten path.
Crawling and Low-Speed Control
The 2023 Toyota Tacoma’s manual transmission significantly enhances crawling and low-speed control, a vital asset for serious off-road enthusiasts. The ability to precisely select gears allows drivers to maintain a consistent, controlled pace over rocks, logs, and uneven terrain. Engine braking becomes a powerful tool, preventing unwanted acceleration and maximizing control on descents.
Unlike automatic transmissions that can sometimes hunt for gears, the manual provides direct, predictable power delivery. This is particularly beneficial when navigating technical obstacles where precise throttle and clutch modulation are essential. The Tacoma’s manual gearbox, coupled with its 4×4 system, delivers a level of finesse and control that’s difficult to replicate with an automatic, making it a favorite among experienced off-roaders.
Traction and Stability Features
The 2023 Toyota Tacoma, even with a manual transmission, benefits from Toyota’s suite of advanced traction and stability features. These systems work seamlessly to enhance control in challenging conditions, supplementing the driver’s skill. Standard features like Traction Control (TRAC) help prevent wheelspin during acceleration, distributing power to the wheels with the most grip.
Vehicle Stability Control (VSC) actively mitigates skidding by selectively applying brakes and adjusting engine power. When equipped with 4-wheel drive, the Tacoma incorporates an electronically controlled transfer case, allowing drivers to select between various modes for optimal traction. These systems, combined with the driver’s precise gear selection via the manual transmission, create a highly capable and confident off-road experience, ensuring stability and control on diverse surfaces.
Common Issues and Reliability
The 2023 Toyota Tacoma, generally known for its robust reliability, exhibits a few potential concerns, even with the manual transmission. Clutch wear is a typical maintenance item, dependent on driving style and usage, particularly with frequent off-road excursions or towing. Some owners have reported slightly notchy shift patterns, especially when the transmission is cold, though this doesn’t typically indicate a major issue.
Like all vehicles, regular maintenance is crucial. Ensuring proper fluid levels and timely servicing can prevent more significant problems. The Tacoma’s overall reputation for longevity remains strong, and the manual transmission, while requiring more driver involvement, doesn’t inherently introduce new major reliability concerns compared to the automatic variant. Proactive maintenance and attentive driving contribute to a long-lasting ownership experience.
Maintenance and Repair Considerations
Maintaining a 2023 Toyota Tacoma with a manual transmission involves standard procedures alongside specific considerations. Regular clutch inspections are vital, monitoring for slippage or unusual wear, especially with demanding use. Transmission fluid changes, though less frequent than automatic transmissions, are still necessary to ensure smooth shifting and component longevity.
Expect to replace the clutch at some point, dependent on driving habits; costs vary based on labor rates and parts quality. Skilled technicians familiar with manual transmissions are recommended for repairs. Routine checks of shift linkage and bushings can prevent imprecise shifting. Overall, the Tacoma’s robust design minimizes complex repairs, but proactive maintenance is key to avoiding costly issues and preserving the driving experience.
Comparison with Automatic Transmission Tacoma
Comparing the 2023 Tacoma with a manual versus automatic transmission reveals distinct differences. The automatic offers convenience and ease of use, particularly in stop-and-go traffic, while the manual provides a more engaging driving experience and greater control, especially off-road. Performance-wise, the manual Tacoma generally exhibits slightly lower acceleration times due to driver skill dependency.
Fuel economy is often comparable, though driving style significantly impacts results. Cost-wise, manual Tacomas typically have a lower initial price point. However, the automatic transmission’s wider availability and resale value should be considered. Ultimately, the choice hinges on driver preference – prioritizing involvement and control versus convenience and ease.
Performance Differences
The 2023 Tacoma’s performance varies noticeably between the manual and automatic transmissions. The manual transmission allows for a more direct connection to the engine, potentially offering quicker response times when downshifting for overtaking or navigating challenging terrain. However, achieving optimal acceleration requires skillful clutch and gear management from the driver.
Automatic Tacomas deliver consistent, smooth power delivery, simplifying the driving experience. While the automatic may slightly reduce engine braking effectiveness, it compensates with convenient gear selection. The manual transmission often feels more raw and engaging, appealing to enthusiasts, while the automatic prioritizes effortless operation. Both configurations share the same engine, but the transmission impacts how that power is utilized.
Cost Comparison
Generally, the 2023 Toyota Tacoma equipped with a manual transmission carries a slightly lower Manufacturer’s Suggested Retail Price (MSRP) compared to its automatic counterpart. This price difference, though often modest – typically around $1,000 to $1,500 – can be a deciding factor for budget-conscious buyers. However, the overall cost of ownership needs broader consideration.
Potential savings on the initial purchase price may be offset by factors like clutch replacement costs associated with the manual transmission over the vehicle’s lifespan. Automatic transmissions, while initially more expensive, often require less frequent and potentially less costly maintenance. Financing rates and insurance premiums are usually comparable between the two transmission options, making the initial price difference the most significant cost consideration.
Availability and Pricing
The 2023 Toyota Tacoma manual transmission options were primarily concentrated in the SR and TRD Sport trims, limiting broader availability across the entire Tacoma lineup. Production numbers for manual variants were lower than automatic models, potentially leading to longer wait times or limited regional stock. Pricing varied based on location, dealer incentives, and selected options.
The base SR trim with a manual transmission started around $28,250, while the TRD Sport manual typically began around $37,800. These figures represent the MSRP and do not include destination charges, taxes, or dealer add-ons. Finding a specific configuration might require contacting multiple dealerships or utilizing Toyota’s online inventory search tools. Demand influenced pricing, with popular trims potentially commanding premiums.

Future of Manual Transmissions in the Tacoma
The future of manual transmissions in the Toyota Tacoma remains uncertain, mirroring a broader industry trend towards automatic transmissions and advanced driver-assistance systems. While the 2023 model offered a 6-speed manual in select trims, its continued availability in subsequent generations is not guaranteed. Market demand and shifting consumer preferences heavily influence Toyota’s decisions.
With the arrival of the fully redesigned 2024 Tacoma, the manual transmission option was discontinued entirely. This suggests a strategic move by Toyota to focus on automatic transmissions, potentially prioritizing fuel efficiency, technological integration, and broader appeal. However, a dedicated enthusiast base continues to advocate for a manual option, potentially influencing future considerations. Hybrid powertrains and sophisticated automatic systems are likely to dominate the Tacoma’s future.
The 2023 Toyota Tacoma with a manual transmission presents a compelling choice for driving purists and those seeking a more engaging experience. It delivers a direct connection to the vehicle, enhanced control, particularly off-road, and a satisfying sense of involvement often missing in automatics. However, it’s not without trade-offs.
Consider your daily driving conditions. If you frequently encounter stop-and-go traffic, the manual may become tiresome. The automatic offers greater convenience. For serious off-road enthusiasts prioritizing low-speed crawling and precise control, the manual is a strong contender; Ultimately, the decision hinges on your priorities. If you value driver engagement and aren’t deterred by the learning curve, the 2023 Tacoma manual is a rewarding option, but its discontinuation in later models makes it a unique find.